In my last blog post, I discussed elements to consider regarding colours and materials for printing barcodes. In this post, I’ll address the size and position of the barcode required to ensure proper scannability, particularly with regards to UPC codes that are found on different types of packaging of retail products.
Scannability = right size
The barcode itself requires very little space. According to GS1 Canada, the national division of a worldwide organization that manages supply chain standards, the nominal size of a standard barcode (with 12 figures) has a total width of 1.469”. This nominal sized barcode may be reduced by 20% at the most and must respect the proportions. This code may also be enlarged by up to 200%.
Additional indications:
- The total width of the barcode includes a margin of 0.091” on each side of the bars (also known as “quiet zone”). These margins need to be respected so that the code can be read correctly.
- The bars at each end of the code, that are longer than the other bars, need to have a minimum height of 1.02”.
- For more width: If you have small packages and therefore limited, some UPC codes may be reduced to 8 figures (derived from the 12-figure barcode) for a total width of 0.871” (including margins). An interesting alternative consists of a 2D code that would significantly reduce the code’s size without affecting its scannability, but make sure that your clients will be able to read those 2D codes.
- For more height: You may reduce the size of the figures, but it’s not recommended to truncate the bars as this will reduce the code’s scannability.
Scannability = right position
Ideally, the barcode should be placed on the package’s natural bottom and in the centre if possible. The positions of the dates and lot numbers on the products also need to be considered as they could potentially interfere with the scanning of the barcode.
Additional indications:
- Flat-bottomed packages (boxes), or flexible packages with contents that flatten the bottom (flour, bread, butter) should follow the natural bottom rule.
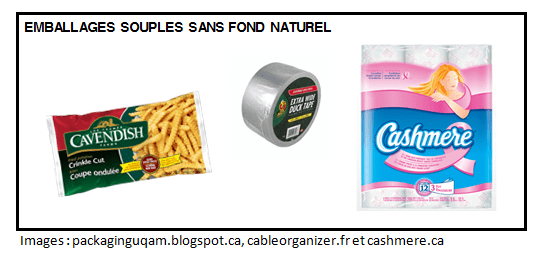
- If you have flexible packaging with no natural bottom (chips, frozen vegetables, etc.), you should print the code on the back of the package and as close to the centre as possible, on the part of the package that is the flattest once the package is filled with its contents.

- Concerning packages with convex bottoms, such as bottles, cans, plastic trays or jars, the barcodes can be printed on the back or on the side, paying attention to avoid the folds as this may interfere with scanning. For the plastic trays or small jars, the barcode could be placed on the lid if it has the biggest area and if the lid’s depth is a half an inch maximum.
- The barcode should never be more than a half an inch from the scanning area. If you have blister packs (also known as bubble packs, which consist of a plastic blister attached to cardboard) with the barcode printed in front, you should position the barcode so that it can be read directly or by tilting the package. The edges of the pack’s folds shouldn’t cover the code.

In the third part of this series I’ll take a look at the printing aspect of the barcode. Subscribe to our blog so you don’t miss it!